Multiple Choice Distributed Systems Final Exam Solutions
Show correct answers
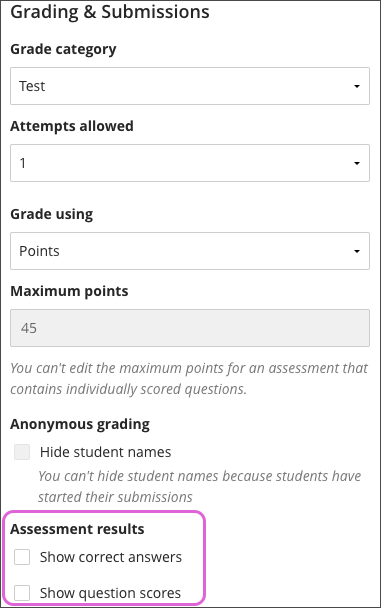
As you select assessment settings, you can allow students to see the correct answers to automatically scored questions after they submit. For example, you want students to see which questions they missed on a multiple attempt assessment, but not see the correct answers. You can also hide answers until all students complete their submissions.
In the assessment settings panel, the Show correct answers and Show question scores aren't selected by default, so correct answers and scores per question are hidden from students. When you want students to review the answers with the assessment content, return to the settings panel and select Show correct answers. Show question scores will be selected automatically. When you show correct answers, you need to also show the question scores. To show only the score per question but not the correct score, clear the check box for Show correct answers.
The due date you set doesn't affect this setting. Select the check box when you're ready to reveal the answers to all students.
After students complete an assessment and return to review it, a banner appears at the top of the assessment. They're informed that their instructor will reveal the correct answers after all students have submitted. Any feedback you've provided won't appear until grades are posted.
If you don't want students to see the banner for assessments without questions, select the check box for Show correct answers during creation.
Automated feedback
Automated feedback allows your to provide feedback on individual auto-graded question types. Students automatically receive the feedback based on the timing release settings you provide. Feedback can be added at the question level at this time.
Select the toggle to enable Automated Feedback. Type your feedback for Correct answer feedback and Incorrect answer feedback. Incorrect answer feedback also displays for partial credit answers. By default, automated feedback displays after the student submission. Select the edit icon to change the release timing settings. Display the feedback after submission or on a specific date. If you're selected Show correct answers, your automated feedback settings need to display at the same time or before your show correct answers date.
About access codes
Add a layer of security to your assessments with an access code.
You can issue an access code to control when students and groups take an assessment. At this time, access codes are generated randomly by the system. You can't customize the access codes.
Assessments refer to tests and assignments, but not SCORM items.
Example:
You add an access code because you want some students to take the assessment before others. You can release the access code only to the first group of students. The students who take the assessment later can't preview the assessment before they take it.
Example:
You can add an access code for a supervised or proctored assessment. Students show proof of identity, receive the code from the instructor or proctor, and take the assessment in the classroom.
If several groups of students take the same test at different times, you can change the access code for each group. Just be certain students haven't saved their work to continue later.
What do students see?
On the Course Content page, all students can see an assessment protected with an access code unless you add release conditions or hide it. All students can open the Details & Information panel to view any instructions you've added. They can't start the assessment without the access code.

The access code isn't stored anywhere in the system. Students can only receive the access code from you or other roles you choose to give it to. You can change the access code as needed and let students know.
Students can use the same code if they save the assessment and want to return later. Students don't need the access code to view the grades and feedback you post.
Add an access code
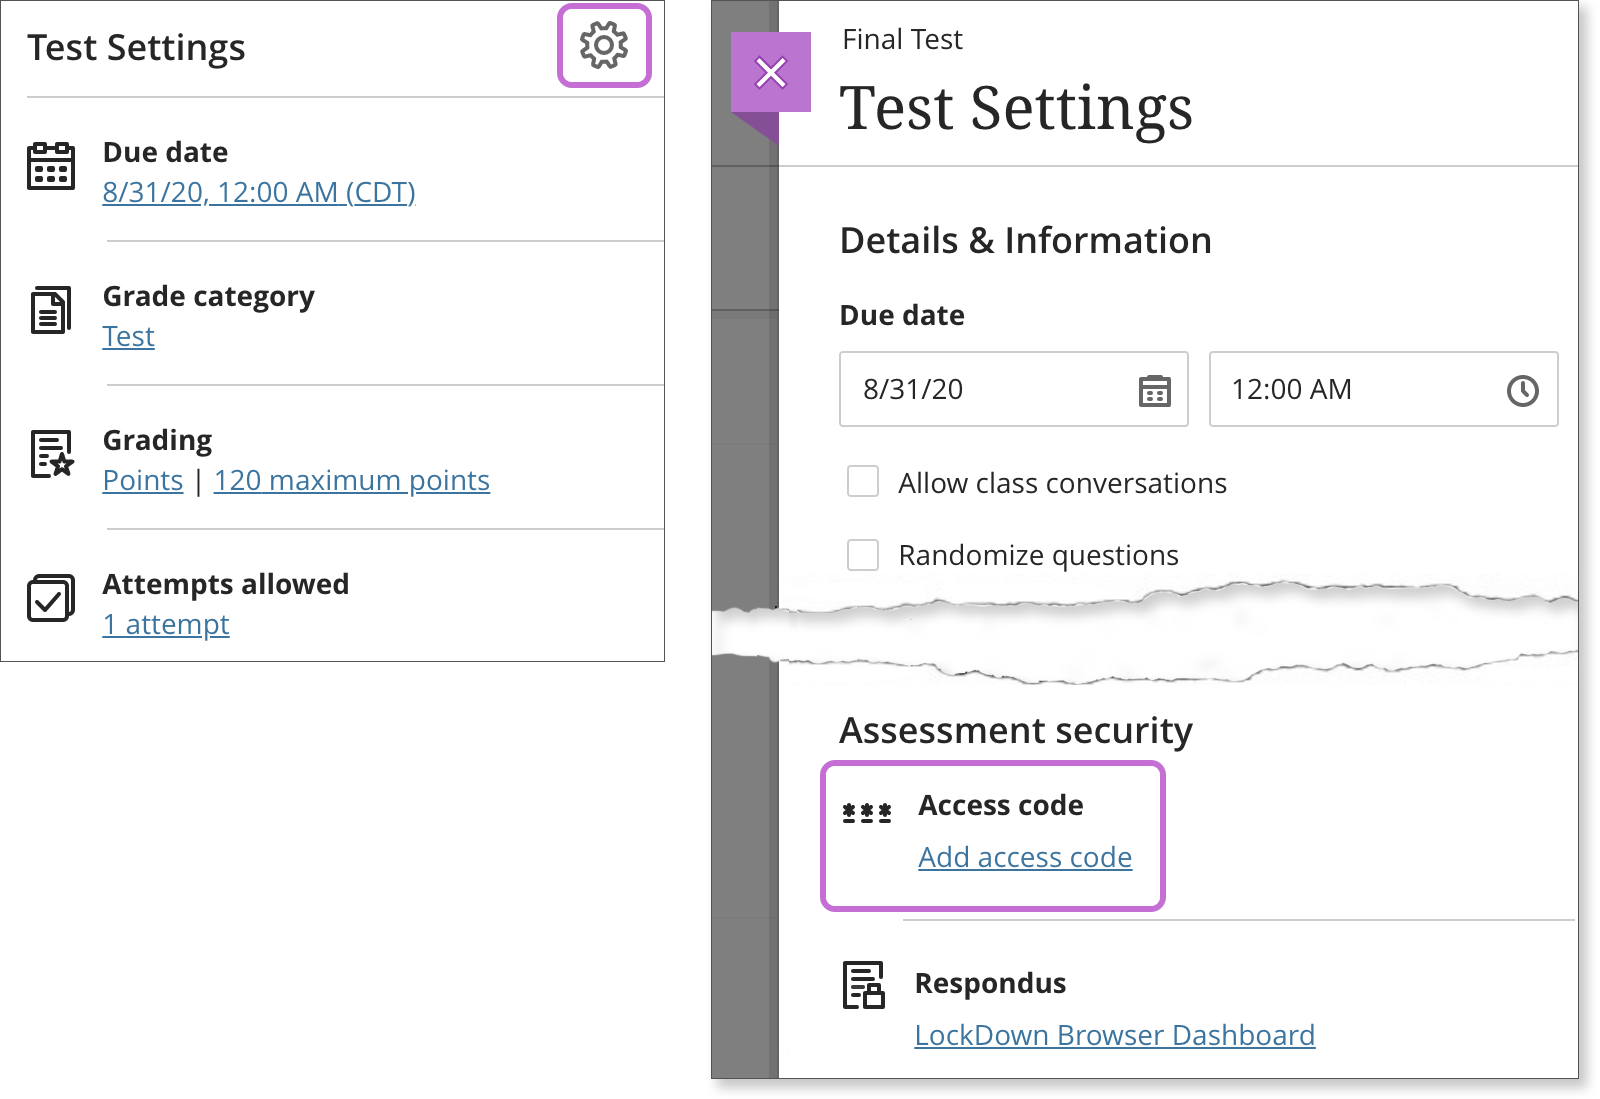
In a test or assignment's Settings panel, select Add access code in the Assessment security section.
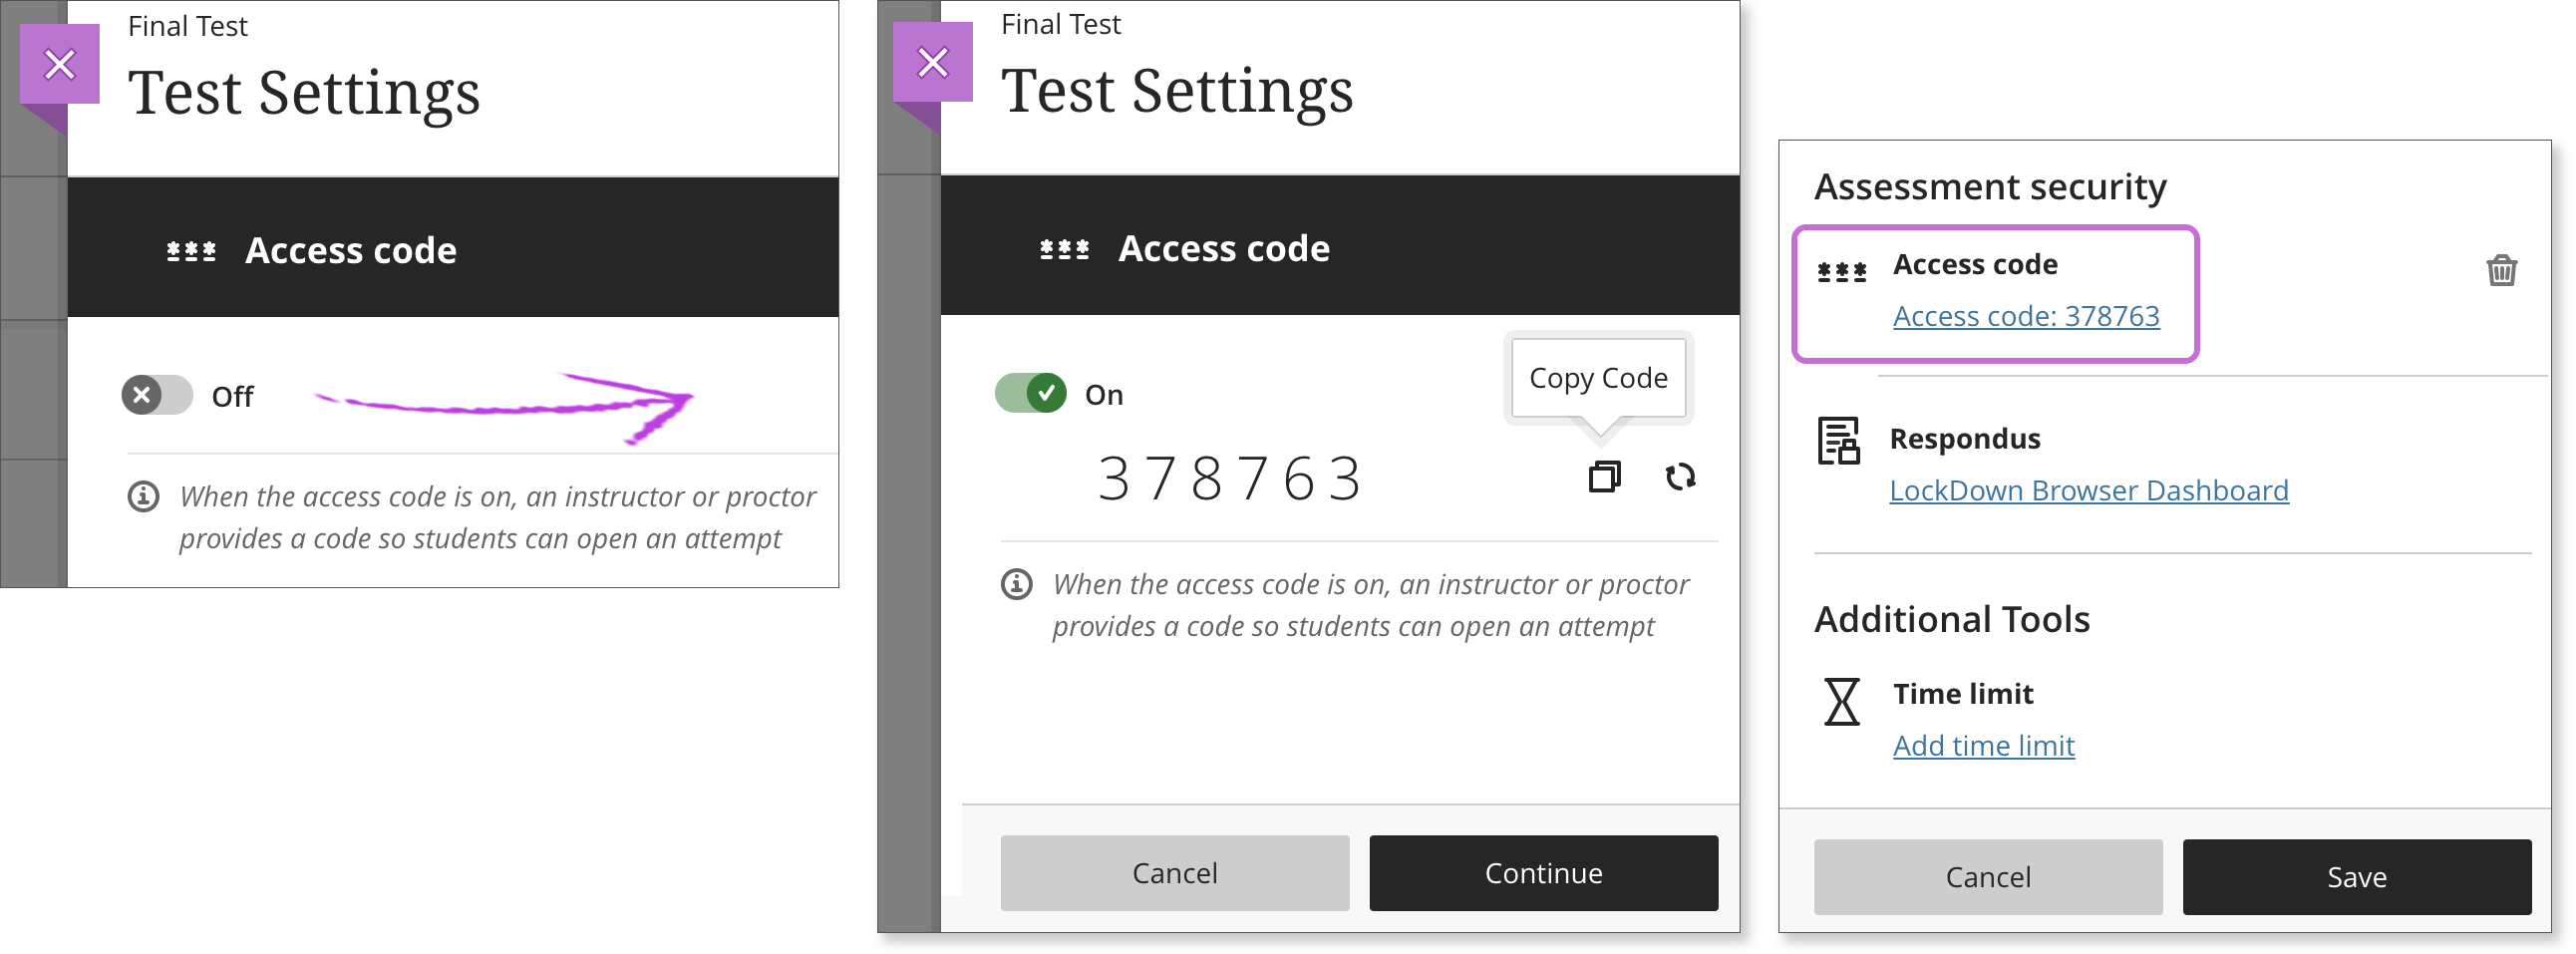
Turn the access code to On. The system randomly generates a 6-digit access code that you can't customize. Use the icons next to the access code to copy it or refresh to change the code. Only instructors can refresh and change the access code. If you turn the code off and on again, the code remains the same.
Select Continue. The access code appears in the Settings panel. You can select the trash can icon to remove the code. Students will no longer need a code to start or continue the assessment.
Reminder: Instructors or proctors provide the access code to students.
LockDown Browser Dashboard
To add more security to your assessments, you can turn on both the Lockdown Browser and access code and they'll work together. Students need to provide the correct access code before the LockDown Browser is launched.
More on the LockDown Browser
Add a timer
You can add a time limit to a test in the Ultra Course View. A time limit can keep students on track and focused on the test because each person has a limited amount of time to submit. The test attempts are saved and submitted automatically when time is up.
You can also allow students to work past the time limit. Additional time allows students to reconnect if they lose connectivity during their attempts. You can allow extra time to see if the original time you set is enough for students to read and answer all the questions. When you grade tests, you can see how much extra time each student used to complete the test. You can also see which questions were answered after the initial time limit. Students also see this same information when they access their graded tests.
At this time, you can't add a time limit to group tests.
In the Test Settings panel, select Add time limit in the Additional Tools section.
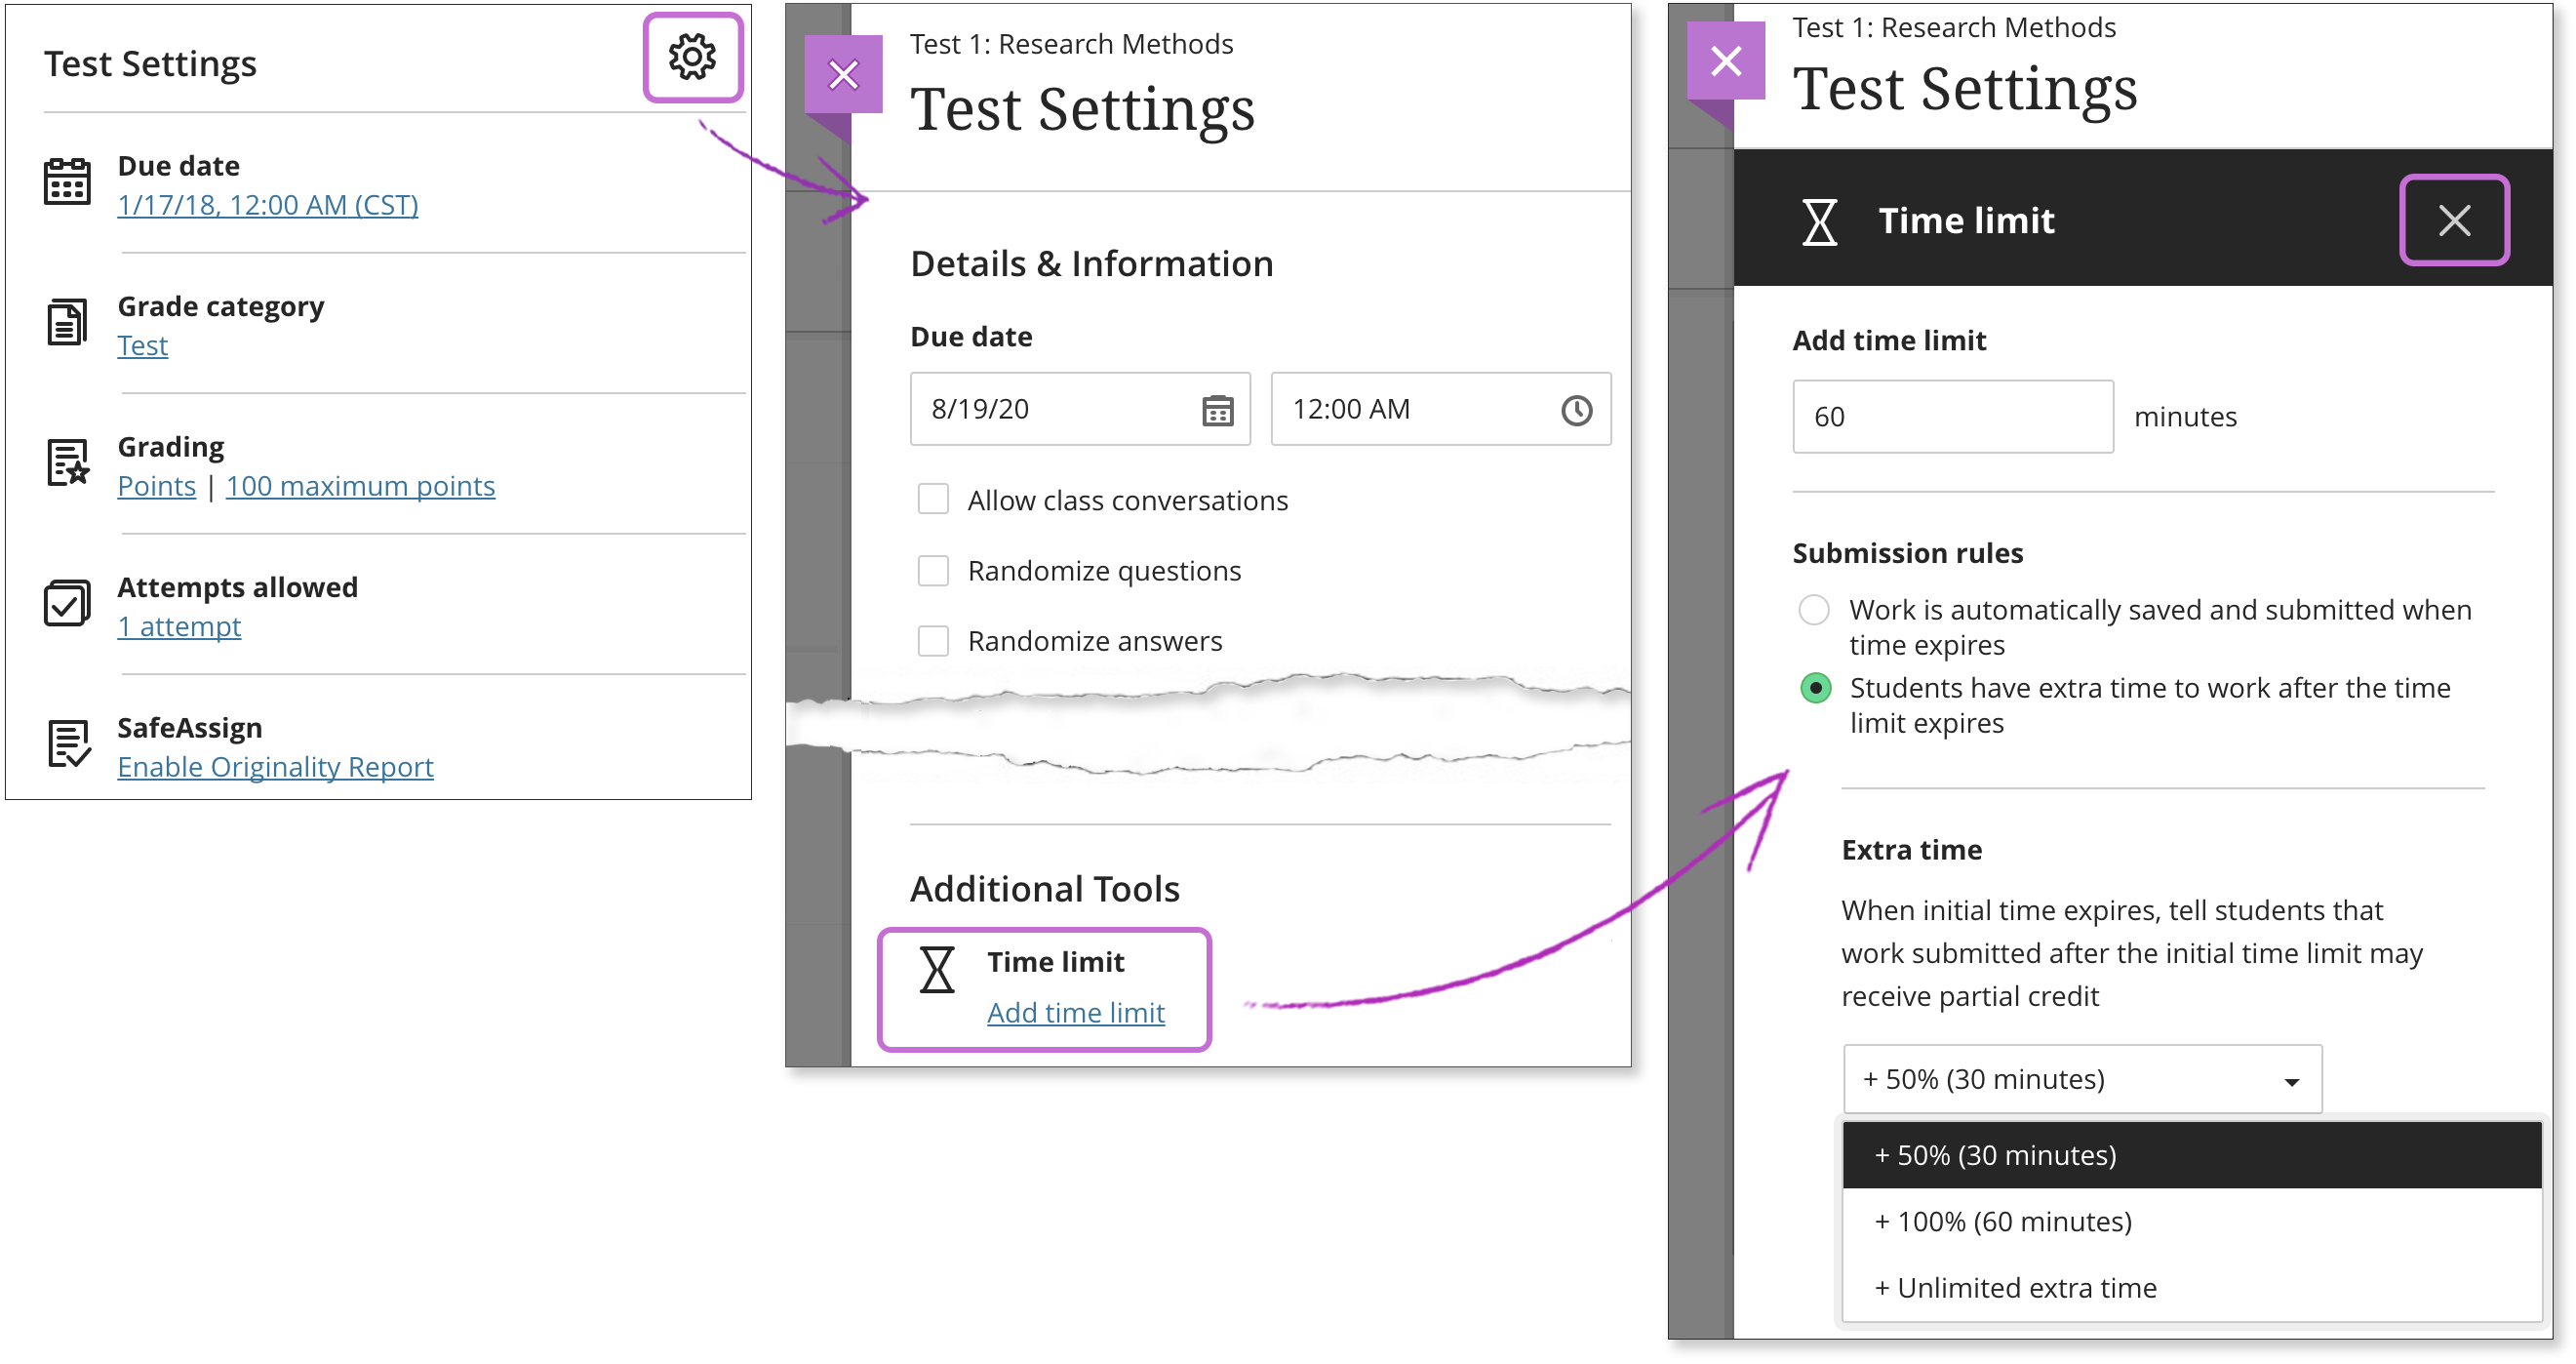
First, type a time limit. You must add time limits as whole numbers between 1 and 480. Decimals aren't supported. Next, select one of two options:
- Work is automatically saved and submitted when time expires: If a student doesn't submit within the time limit, the system saves and submits the test automatically.
- Students have extra time to work after the time limit expires: In the menu that appears when you select this option, choose the amount of extra time:
- 50%
- 100%
- Unlimited extra time
The 50% and 100% options show how much time is added to the time limit before the test is saved and submitted automatically. For example, if you set 60 minutes as the time limit and choose 50% extra time, your students can work for an additional 30 minutes. Your students aren't alerted to the extra time allowed until the initial time limit is almost up. They receive a pop-up message that alerts them to the extra time allowed. They can choose to use the extra time or submit the test. They're informed that they may receive partial credit for work submitted after the time limit.
If you allow multiple attempts, the time limit applies to each attempt.
Select the X to return the Test Settings panel. You can view the time limit setting you made. Select the time limit to make changes. However, you can't edit the time limit after students have made submissions. Point to the time limit to access the Remove icon to remove it. The time limit also appears on the Course Content page with the test details, but the extra time doesn't appear.

Time limit accommodation + time limit
If students have a time limit accommodation and you allow more time to complete an assessment in the settings, the times are combined.
More about time limit accommodations
Student workflow
Students see the time limit with other test details on the Course Content page. They also see the time limit on the test's Details & Information panel and within the test as they're working.
When students select Start attempt, they'll receive a pop-up window to start the timer before they can access the test.
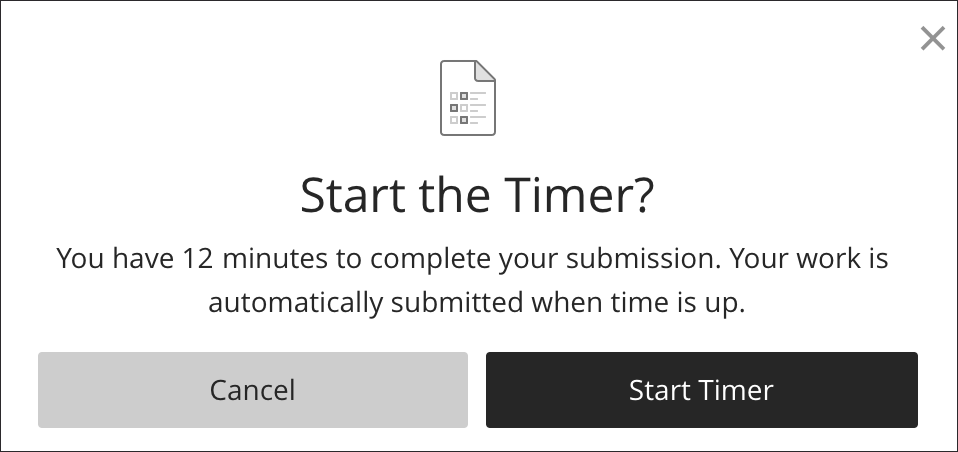
If you allowed extra time, when the initial time is up, another pop-up window informs them they can submit the test now or work longer. They're also informed that work submitted after the limit may receive partial credit. Your students aren't alerted to the extra time allowed until the initial time limit is almost up.

The timer keeps running whether or not students are actively working on the test. The timer appears at the bottom of the window to let students know how much time is left. If they save a draft or leave the test window, the countdown continues and their work is saved and submitted when time is up.

More about grading tests with time limits
Video: Timed Assessments
Watch a video about timed assessments
The following narrated video provides a visual and auditory representation of some of the information included on this page. For a detailed description of what is portrayed in the video, open the video on YouTube, navigate to More actions, and select Open transcript.
Video: Timed assessments shows how to add a timer to assessments.
Multiple attempts
In Test Settings, you can choose to let students submit more than one attempt. Multiple attempts change how the test's final grade is calculated. Choose how you want to calculate the final grade:
- Average of all attempts
- First attempt with a grade
- Attempt with highest grade
- Last attempt with a grade
- Attempt with lowest grade

You can't allow multiple attempts on a group test or when you collect submissions offline.
The Grade attempts setting determines how the final grade is automatically calculated, but you have the option to override the grade. Each attempt is subject to the due date you set for the test. If a student submits an attempt after the due date, the attempt is marked late. Attempts submitted before the deadline are shown as on time.
You can only override the final grade, not the grades for each attempt.
More on grading a test with multiple attempts
Randomize questions and answers
You can randomize questions and their answers to support practice/drilling activities and help students avoid academic dishonesty.
You can only randomize answers for Matching and Multiple Choice questions. If you want to randomize answers for True/False questions, use the Multiple Choice question type with True and False answer choices.
You can use one or both settings so tests appear differently for each student. A message appears on the test's Content Settings page about your randomize answers selection.
Randomize questions
In Test Settings, select Randomize questions to show questions to students in a random order.

Questions appear in order as you create the test. Each time a student begins a test attempt, the questions appear in a different order. If you include references to the question numbers as they appear on the Content and Settings page, don't use the Randomize questions option. The random order changes the question numbering and may cause confusion.
After students start their submissions, you may select or clear the Randomize questions setting.
You can't randomize questions in a test with text blocks or files.
Randomize the order of answers
In Test Settings, select Randomize answers to show Multiple Answer and Multiple Choice answer options to students in a random order.
Answers appear in order as you create the test. Each time a student begins a test attempt, the answers appear in a different order.
After students start their submissions, you can't select or clear the Randomize answers setting.

Enable anonymous grading
When you create a test without questions, you can enable anonymous grading in the Test Settings panel. Student names are hidden while you grade. You may only add text and files to anonymously graded tests.
More on anonymous grading
Enable parallel grading
When you create a test without questions, you can enable parallel grading in the Test Settings panel.
The system randomly assigns graders you choose so each student has two graders for the test. The grading workload is distributed evenly among the graders. Graders can only open the submissions for the students assigned to them. Instructors or reconcilers determine the final grades for students.
More on parallel grading
About assessment exceptions
When special circumstances arise, you can give an individual student an exception on a specific test or assignment. An exception includes additional attempts or extended access, even if the assessment is hidden from other students. You can extend access with the show on and hide after dates which is different from the due date.
You need to set conditional availability—show on and hide after dates—before you set an individual exception for extended access.
An exception overrides the two settings applied to everyone else for only that specific assessment. Students don't see the exceptions you've added.
You set test and assignment exceptions from the assessment's Submissions page or an individual submission. You might use exceptions for students who have internet issues, disabilities, or technology and language differences.
Examples:
- Test with one attempt: Allow more attempts for a student who is blind and wants to use screen reader technology for the first time.
- Assignment with the conditional availability of Hide after date and time: Extend the access to an assignment for a student with internet issues. However, if the due date and time are the same as the original Hide after time, the submission is still marked late in the gradebook.
For a group assignment or group test, you can give an individual group an exception for extended access only. Multiple attempts aren't allowed for group assessments at this time.
More on group exceptions
Exceptions vs. accommodations
Exceptions are different from accommodations you set in the course roster. An accommodation applies to all due dates or time limits in your course for an individual student. Exceptions aren't allowed for due dates and time limits for an individual student or group at this time. Exceptions are only allowed for the show on and hide after dates and additional attempts.
More on accommodations
More on how accommodations work with groups
Create an assessment exception
From an assessment's Submissions page, you can add exceptions for students individually. You can also add exceptions from a student or group's individual submission page. You can't add an exception for an anonymously graded assessment.
From an assessment's Submissions page
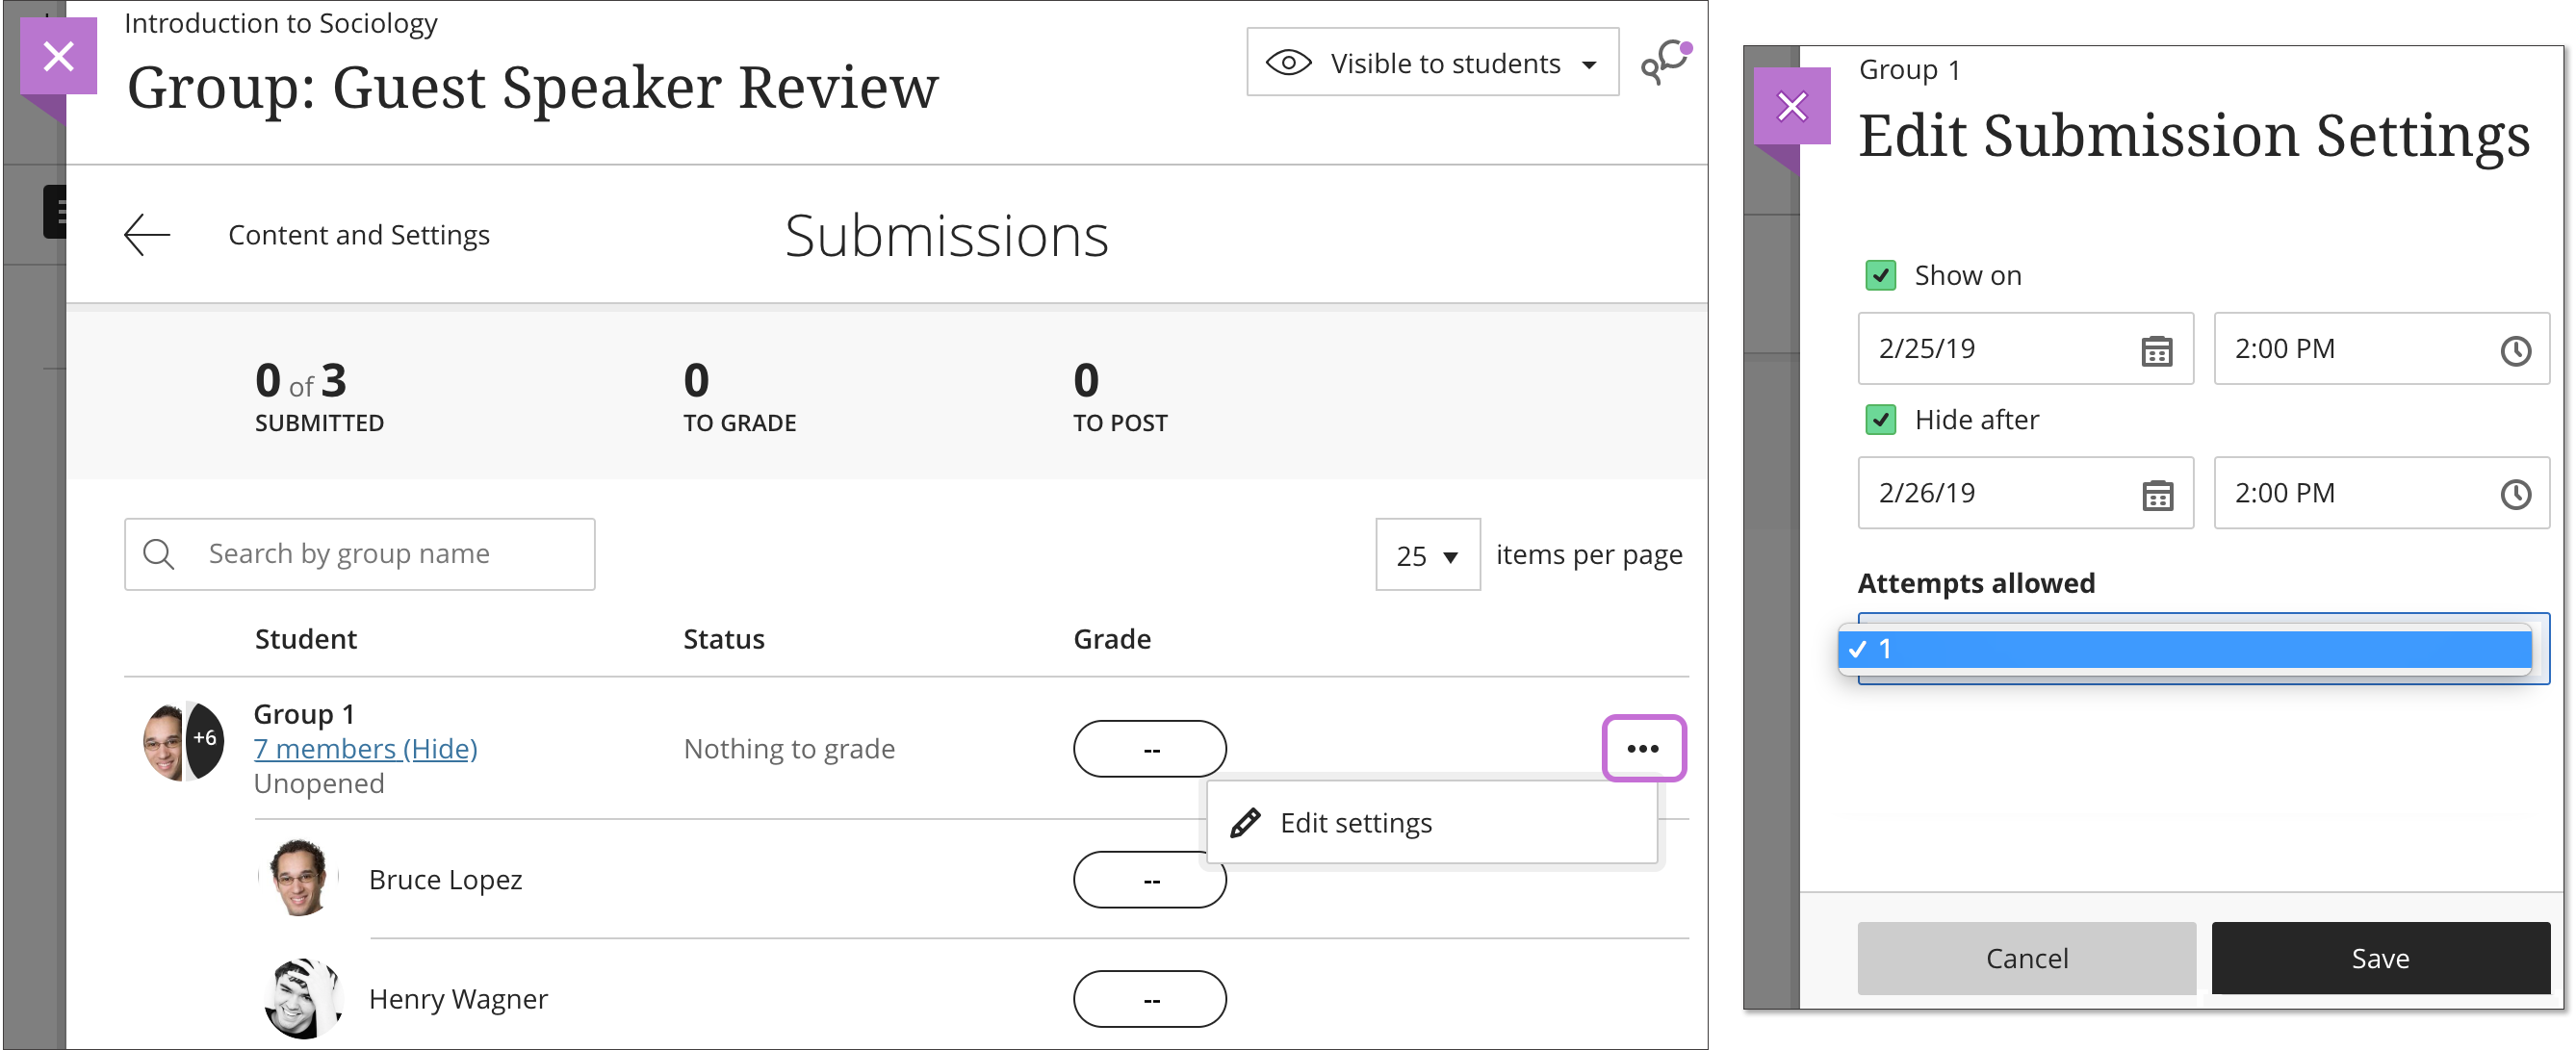
From an assessment's Submissions page, open the menu in a student's row and select Edit settings. The Edit Submission Settings panel opens.
You can change the Show on and Hide after dates and times and allow additional attempts.
More on conditional availability
You can't save until you make a change to the settings. If you don't want to make any changes, select Cancel to close the panel.

From an individual submission
From a student or group's submission page, open the menu next to the grade pill and select Exceptions. The Edit Submission Settings panel opens.

Example of extended access:
If you've hidden content after a certain date and time, you can extend the access for an individual student. For example, "Test 1" is hidden today after 10 AM. A student has internet issues, so you extend the access for just that student to 6 PM. However, if the due date is also at 10 AM, the submission is still marked late in the gradebook.
In the activity stream, the student is notified about the available test, but the extended access period isn't listed in the stream or with the test. You'll need to inform the student about the length of the extended access period. You'll also need to notify students individually when you allow additional attempts.
Exception icon appears
After you allow an exception for a student's assessment, you'll see an icon next to the student's name. The assessment exception icon is the same icon that appears for accommodations. If a student has an accommodation and an exception for an assessment, only one icon appears.
![]()
If you copy an assessment from one course to another, the exceptions don't carry over. Content is set to Hidden from students if you copy individual items into your course. If you copy one course into another course, student-specific data isn't copied.
Add an exception after a grade is posted
You can offer a student an exception for an assessment you've already graded and posted. For example, if you want a student to redo an automatically graded test that has no more attempts, you can add an additional attempt. You'll need to inform the student of the additional attempt as the system doesn't send a notification.

Automatic zeros setting
If you've applied automatic zeros for unsubmitted work in your course, the student has a zero even after you add an exception. The automatic zero is replaced after you grade the submission.
More on automatic zeros
Video: Grant Assessment Exceptions
Watch a video about assessment exceptions
The following narrated video provides a visual and auditory representation of some of the information included on this page. For a detailed description of what is portrayed in the video, open the video on YouTube, navigate to More actions, and select Open transcript.
Video: Grant assessment exceptions shows how to allow an exception on a specific test or assignment to an individual student.
Group assessment exceptions
Only one type of exception is allowed for group assessments. You can give an individual group an extended access exception on a specific group test or group assignment. Because multiple attempts aren't allowed for group assessments at this time, you can't change the attempts allowed.
From a group assessment's Submissions page, you can add exceptions for groups individually. You can also add exceptions from a group's individual submission page.
On a group assessment's Submissions page, the same icon appears for group exceptions and accommodations. The assessment exception icon appears with a group's name. If a group has members with accommodations, the same icon appears with the group's name. Open the menu for each group's name with an icon to view the exceptions you've added. If a group has members with accommodations and an exception for a group assessment, only one icon appears.

When you access groups from an assessment's settings panel, groups with exceptions appear with the icon next to the group name. Group members who have accommodations appear with the same icon next to their names.

Reset an exception
You can remove a student or group's exception to an assessment.
From an assessment's Submissions page > student or group's menu > Edit settings > Reset settings
The exception settings are removed. The student or group now has the original assessment settings for the attempts allowed and the access time period. Select Save to confirm. The icon for the exception is removed unless the student or group also has an accommodation.
You can't reduce the number of attempts after students have started their submissions.

Multiple Choice Distributed Systems Final Exam Solutions
Source: https://help.blackboard.com/Learn/Instructor/Ultra/Tests_Pools_Surveys/Test_and_Survey_Options